


Welcome back to our Azure Blog Series, part 3 of 4.
In part 1 we introduced you to Azure Governance and the importance behind planning your move to the Cloud. In part 2 we delved into more technical territory, where we covered off the EA Portal, Enterprise Azure Roles, Subscription Methodologies, the new Azure Management Groups and Tagging.
Part 3 will see us dive into Policies, RBAC, Automation and Resource Locks. Let's begin!
Azure Policies
This blog will cover off what you should be considering when designing your policy strategy and the basics to help establish a governance framework.
Policies are there to help you assess and enforce enterprise-wide governing standards, they’re designed to govern large Azure environments but that’s not to say that they’re irrelevant in SME’s. Enforcing policies to halt the ability to spin up large M-series virtual machines will likely be welcomed in any organisation!
Policies can be assigned to resource groups, subscriptions or management groups and are inherited by all "child resources". This means that if a policy is applied to a resource group, it is applied to all the resources in that resource group. However, you can exclude a sub-scope from the policy assignment.
Here are some examples of what you may consider pertinent to your solution:
- Allowed locations
- You may have data sovereignty laws that need to be enforced
- Allowed / Disallowed resource types
- Public IP addresses may be rejected for one resource group, but allowed for another
- Allowed resource SKU's (i.e. storage accounts, VM's)
- This will cease unauthorised access
- Apply tag and default value | Enforce tag and value
- You might want to enforce tagging to ensure cost centres are applied
- Install VM Extensions (i.e. OMS agents, Microsoft Anti-Malware)
- A directive from the business states agent x needs to be installed on VM's
- Require SQL Server version 12.0
- Minimum version requirements
- Require Hybrid Use Benefit
- Forced cost savings
Azure Policy – Items to Remember
Below are some items you need to be aware of when planning out your policies:
- Full scan every 24 hours
- Delta scan every 15-20 minutes
- New policy assignment triggers new scan
- Scan up to 25K resources per sub, per hour
- Append takes precedence over deny
- Maximum 1000 assignments per subscription (between initiatives and policies)
- ARM cache – takes time to replicate to all locations - log off and back on to refresh the cache
If you’ve been working with Azure Policies, no doubt you’ve found that managing them can be somewhat challenging. Microsoft have a UI to help you manage all your policies from a single pane of glass which can be accessed here - https://aka.ms/getpolicy. Microsoft also have Policy Initiatives which group together several policy definitions into a single logical group to reduce the number of policy assignments you need to manage.
RBAC
Another feather in the cap of Azure Governance is "Role Based Access Control" also known as RBAC. It’s a mechanism to help you define who gets what access in your environment, it really is a crucial aspect to planning your controls because it gives you the ability to set further boundaries. An example of this would be isolating your SQL team from the Web Apps segment of your environment, essentially segregating duties.
There are several built-in roles in Azure, a detailed list can be found here. You can assign these packaged roles to users, groups and service principals. If you need to define a role that falls outside of what Microsoft supplies, you do have the ability to create a custom role to meet your needs.
Within RBAC, there are three fundamental built-in roles that are assigned for all resources by default, they are:
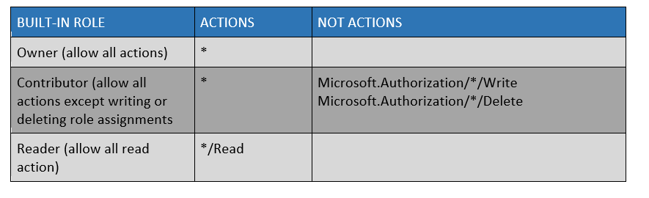
There is also User Access Administrator which lets you manage user access to Azure resources above the roles mentioned in the table.
RBAC Custom Roles
Sometimes a more granular or specific role is required to meet your individual needs, you may have a scenario where you need your operations team to manage virtual machines, including the managed disks used by the VM's. By default, the VM contributor role does not provide rights for managed disks, this is where a custom role will allow you the ability to grant this type of access.
Currently, there is no way to create custom roles via the UI, they must be created using Azure PowerShell, Azure CLI, or the REST API.
Custom roles are defined as a JSON template. The easiest way to create one of these is to download the role template for one of the existing roles and edit accordingly. Check out this great Microsoft article which details how you can do this using PowerShell.
Resource Locks
Locks provide a way for administrators to lock down Azure resources to prevent deletion or changing of a resource. These locks sit outside of the Role Based Access Controls (RBAC) hierarchy and when applied, will place the restriction on the resource for all users. Resource locks can be applied to resource, subscriptions or resource group and are inherited by child resources.
There are two types of resource locks that can be applied:
1. CanNotDelete
This prevents anyone from deleting a resource whilst the lock is in place, however, they may make changes to it
2. ReadOnly
As the name suggests, it makes the resource read only, so no changes can be made, and it cannot be deleted. Permission to create and remove locks requires access to one of the following RBAC permissions:
- Authorisation/*
- Authorisation/locks/*
By default, these actions are only available on the Owner and User Access Administrator built in RBAC roles. You can add them to custom roles if required. This detailed article guides you through creating locks to help further protect your environment.
Automation
Ever hear the adage “work smarter not harder”? Here is where you can put that into practice.
Leveraging this unique feature will not only ensure repeatable, mundane tasks are taken care of for you, but also mitigate the human error factor when it comes to deploying and managing your environment. It really is a significant factor in the drive to propel business transformation and reduce IT effort, allowing you to focus on more strategic solutions for your business.
Automation is a beast unto itself, you could leverage this service to push out simple configuration tasks, to fully automating the deployment of your environment using ARM templates, run books and DSC. All automation tasks require an Automation Account, keep this in mind when exploring your options.
ARM templates are written in JSON format and leverage expressions which you use to construct values for your deployment, it gives you the ability to define the dependencies between resources, so they are deployed in the correct order. You can also apply tagging.
Runbooks are used to reference automation assets such as credentials, variables, connections, and certificates to further build out your automation workflow capability. It’s a valuable tool to have in your asset. You may even nest a run book within a run book to build out more complex workflows.
Azure supports several types of runbooks which are described in this article, you can also create your own runbooks from scratch or modify runbooks from the Runbook Gallery based on your own requirements. There’s also Azure Automation for Desired State Configuration or DSC for short which you can use, in conjunction with your ARM template to:
- Enable or disable server roles and features
- Manage files and directories
- Starting, stopping, and managing processes and services
- Deploy new software or software updates
- Fix a configuration that has drifted away from the desired state
If you're familiar with traditional DSC and how it’s configured, there’s no difference in Azure except that within Azure, the pull-server is automatically provisioned. DSC can send detailed reporting status data to the built-in pull server and then have this data sent to your Log Analytics workspace for analysis.
If you're new to all of this, I would suggest starting with something simple. Start/Stop VM's is a great starting point, it not only gets you adopting automation but also helps your organisation save money by only running workloads during business hours if that’s their only requirement. It helps build an ROI story which management value, and in turn will fuel a desire for additional automation work. Start off in Test/Dev; automation is a powerful tool and misusing it in production will cause unnecessary difficulties.
In March 2018, it was announced that update management, inventory, and change tracking in Azure Automation was made generally available, which further helps you meet your compliance obligations. Read about it here.
Our final blog on Azure Governance, part 4, will follow next week, where we’ll cover off compliance and the tools you can adopt to help meet your obligations. In the meantime, if you have a challenging Azure project coming up or if you have any questions regarding this blog, please feel free to contact Eddie El-leissy, our Azure Solution Architect.